


问题描述

界面上的扩容云硬盘功能只支持到云主机块设备这一级,后续仍需要通过手动操作在云主机内部进一步扩展分区/逻辑卷及对应文件系统。这里给出常见场景下的操作方法供参考。
解决方案
扩展系统盘分区及文件系统(Windows)
处理思路
直接使用Windows自带的磁盘管理器进行分区及文件系统扩容。
注意事项
- 在云主机开机状态下扩容系统盘后,可直接按照下述操作步骤操作;在云主机关机状态下扩容系统盘后,需先开启云主机,再按照下述操作方法操作。
- 下述操作方法仅能扩容硬盘中最后一个分区。如果不满足此条件,需要另行参考Windows的官方指南。
- 错误的人工操作可能造成不可逆转的数据丢失,建议在进行下述操作前对云主机进行备份。
操作方法
进入[计算机管理]-[存储]-[磁盘管理],单击菜单栏中的
操作-重新扫描磁盘,如图所示: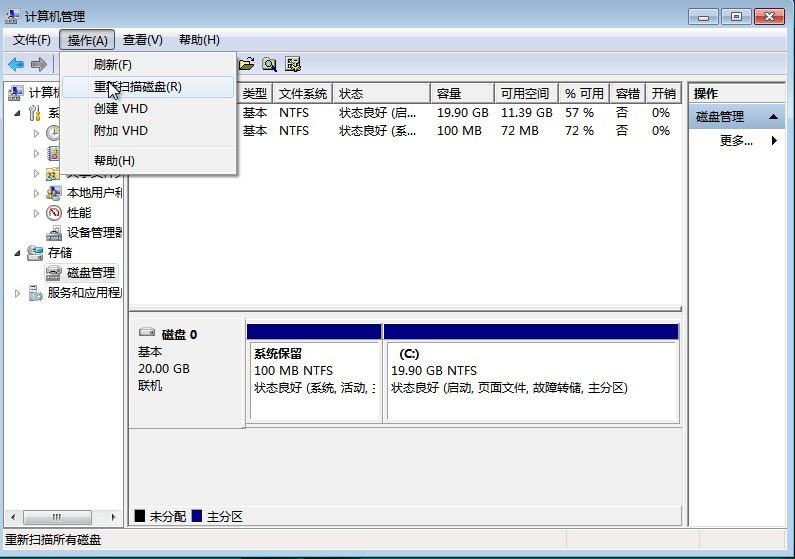
扫描完成后,可看到此硬盘出现未分配的空间,此例中为8.61GB。
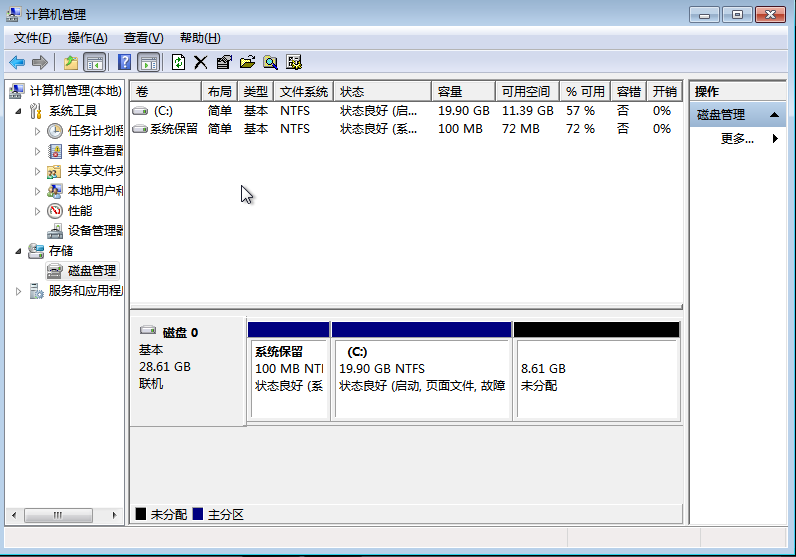
选择C盘,单击鼠标右键,选择扩展卷选项,根据提示进行分区及文件系统扩容。
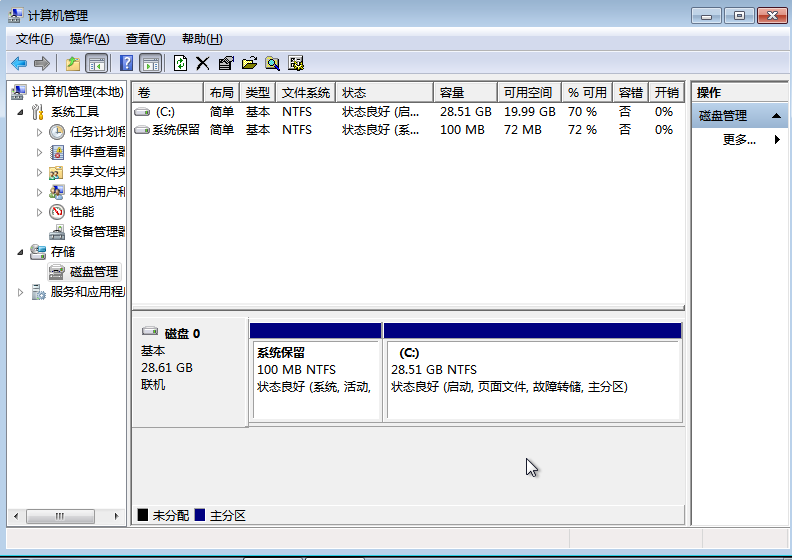
上一步执行完成后,可查看扩容是否成功。如下图所示,C盘已成功扩容。
扩展系统盘分区及文件系统(Linux)
系统盘数据来源于平台中标准镜像仓库的镜像
处理思路
利用标准镜像仓库Linux镜像中已内置的自动化分区及文件系统扩容组件,完成扩容操作。
注意事项
- 在云主机开机状态下扩容系统盘后,如果业务上允许云主机关机,可在云主机内部执行重启操作,云主机在重新开机过程中会自动完成扩容分区及根目录文件系统的操作。
- 在云主机关机机状态下扩容系统盘后,云主机会在下一次开机过程中自动完成扩容分区及根文件系统的操作。
操作方法
在云主机页面执行云主机重启操作,或登录云主机内部,执行Shell命令reboot。
[root@localhost ~]# reboot

Broadcast message from root@localhost

(/dev/pts/0) at 22:20 ...

The system is going down for reboot NOW!
系统盘数据来源于用户自定义镜像且已使用LVM
处理思路
给扩容后的云硬盘创建一个新的分区,使用该分区创建PV后,加入到需要扩容的VG,并扩展对应的LV,最后再扩展根目录文件系统大小。
注意事项
- 在云主机开机状态下扩容系统盘后,可直接按照下述操作步骤操作;在云主机关机状态下扩容系统盘后,需先开启云主机,再按照下述操作方法操作。
- 错误的人工操作可能造成不可逆转的数据丢失,建议在进行下述操作前对云主机进行备份。
操作方法
查看扩容后最新的系统盘容量。
 # View the capacity of the system disk before expanding the size of the cloud hard disk
 [root@localhost ~]# lsblk
 NAME MAJ:MIN RM SIZE RO TYPE MOUNTPOINT
 vda 252:0 0 3G 0 disk
 ├─vda1 252:1 0 500M 0 part /boot
 └─vda2 252:2 0 2.5G 0 part
 ├─VolGroup-lv_root (dm-0) 253:0 0 2.2G 0 lvm /
 └─VolGroup-lv_swap (dm-1) 253:1 0 276M 0 lvm [SWAP]

 # Check the capacity of the system disk again after you perform the cloud hard disk expansion operation on the platform. You can see that the system disk vda has 2GB of free capacity in multiple places.
 [root@localhost ~]# lsblk
 NAME MAJ:MIN RM SIZE RO TYPE MOUNTPOINT
 vda 252:0 0 5G 0 disk
 ├─vda1 252:1 0 500M 0 part /boot
 └─vda2 252:2 0 2.5G 0 part
 ├─VolGroup-lv_root (dm-0) 253:0 0 2.2G 0 lvm /
 └─VolGroup-lv_swap (dm-1) 253:1 0 276M 0 lvm [SWAP]
使用新增的空闲容量,创建一个约为2GB大小的新分区。
 [root@localhost ~]# parted /dev/vda
 GNU Parted 2.1
 Using /dev/vda
 Welcome to GNU Parted! Type 'help' to view a list of commands.

 # Print the current partition information
 (parted) print
 Model: Virtio Block Device (virtblk)
 Disk /dev/vda: 5325MB
 Sector size (logical/physical): 512B/512B
 Partition Table: msdos

 Number Start End Size Type File system Flags
 1 1049kB 525MB 524MB primary ext4 boot
 2 525MB 3221MB 2696MB primary lvm

 # Print the Free Space information, such as the Free Space output in the command

 (parted) print free
 Model: Virtio Block Device (virtblk)
 Disk /dev/vda: 5325MB
 Sector size (logical/physical): 512B/512B
 Partition Table: msdos

 Number Start  End    Size  Type    File system Flags
      32.3kB 1049kB 1016kB        Free Space
    1 1049kB 525MB  524MB primary ext4        boot
    2 525MB 3221MB 2696MB primary             lvm
      3221MB 5325MB 2104MB        Free Space

 # Use the value of the Start column as the Start position of the new partition and the value of the End column as the End position of the new partition based on the output idle space information.
 # Run the mkpart command to create a new partition.
 (parted) mkpart primary 3221 5325
 Warning: WARNING: the kernel failed to re-read the partition table on /dev/vda
 (Device or resource busy). As a result, it may not reflect all of your changes
 until after reboot.

 # View the latest partition information. A new partition with partition number 3 is visible.
 (parted) print
 Model: Virtio Block Device (virtblk)
 Disk /dev/vda: 5325MB
 Sector size (logical/physical): 512B/512B
 Partition Table: msdos
 Number Start End Size Type File system Flags
 1 1049kB 525MB 524MB primary ext4 boot
 2 525MB 3221MB 2696MB primary lvm
 3 3221MB 5325MB 2103MB primary
更新分区表信息到内核,并根据命令输出的提示决定是否重启云主机。
 # If the kernel version is low, the following command execution results will be warned and prompt to restart the cloud host, you need to restart before proceeding to the next steps.
 [root@localhost ~]# partprobe /dev/vda
 Warning: WARNING: the kernel failed to re-read the partition table on /dev/vda
 (Device or resource busy). As a result, it may not reflect all of your changes
 until after reboot.
使用新分区创建物理卷(PV)。
 # Check whether the new partition takes effect. In this example, a new partition/vda3 with a capacity of 2GB appears.
 [root@localhost ~]# lsblk
 NAME MAJ:MIN RM SIZE RO TYPE MOUNTPOINT
 vda 252:0 0 5G 0 disk
 ├─vda1 252:1 0 500M 0 part /boot
 ├─vda2 252:2 0 2.5G 0 part
 │ ├─VolGroup-lv_root (dm-0) 253:0 0 2.2G 0 lvm /
 │ └─VolGroup-lv_swap (dm-1) 253:1 0 276M 0 lvm [SWAP]
 └─vda3 252:3 0 2G 0 part

  # Create a physical volume (PV)
 [root@localhost ~]# pvcreate /dev/vda3
 Physical volume "/dev/vda3" successfully created
扩展新创建的物理卷(PV)到根目录文件系统所在卷组(VG)。
 # According to the previous command output, the volume group name of the root directory is VolGroup.
 # Confirm the capacity of the current volume Group
 [root@localhost ~]# vgs
 VG #PV #LV #SN Attr VSize VFree
 VolGroup 1 2 0 wz--n- 2.51g 0

 # Expand the volume group. The first parameter of the command is the volume group name and the second parameter is the new partition name.
 [root@localhost ~]# vgextend VolGroup /dev/vda3
 Volume group "VolGroup" successfully extended
将卷组(VG)中的空闲空间扩展到根目录所在的逻辑卷(LV)。
 # Confirm the logical volume (lv) to be extended. In this example, lv_root where the root directory is located
 [root@localhost ~]# lvs
 LV VG Attr LSize Pool Origin Data% Move Log Cpy%Sync
 Convert
 lv_root VolGroup -wi-ao---- 2.24g
 lv_swap VolGroup -wi-ao---- 276.00m

 # Run the lxextend command to expand the logical volume.
 [root@localhost ~]# lvextend -l +100%FREE /dev/VolGroup/lv_root
 Extending logical volume lv_root to 4.20 GiB
 Logical volume lv_root successfully resized

 # View the expanded logical volume information. In this example, the size has been expanded from the original 2.24GB to 4.2GB.

 [root@localhost ~]# lvs
 LV VG Attr LSize Pool Origin Data% Move Log Cpy%Sync
 Convert
 lv_root VolGroup -wi-ao---- 4.20g
 lv_swap VolGroup -wi-ao---- 276.00m
扩展根目录上文件系统的容量。
 # Check the current capacity of the root directory file system.
 [root@localhost ~]# df -h | grep -w '/'
 /dev/mapper/VolGroup-lv_root 2.3G 737M 1.4G 35% /

 # Select a scaling tool based on the file system type.
 # If the file system type is ext2,ext3, or ext4, you can use resize2fs (this example is ext4, so resize2fs is used)
 # When the file system type is xfs, you can use xfs_growfs.
 [root@localhost ~]# resize2fs /dev/VolGroup/lv_root
 resize2fs 1.41.12 (17-May-2010)
 Filesystem at /dev/VolGroup/lv_root is mounted on /; on-line resizing required
 old desc_blocks = 1, new_desc_blocks = 1
 Performing an on-line resize of /dev/VolGroup/lv_root to 1099776 (4k) blocks.
 The filesystem on /dev/VolGroup/lv_root is now 1099776 blocks long.

 # Check the current capacity of the root directory again. The capacity has been expanded from 2.3GB to 4.2GB.
 [root@localhost ~]# df -h | grep -w '/'
 dev/mapper/VolGroup-lv_root 4.2G 738M 3.3G 19% /
系统盘数据来源于用户自定义镜像且未使用LVM
注意事项
- 云主机的内核版本要求不低于3.10,如果条件不满足,不能确保本示例能成功执行。
- 在云主机开机状态下扩容系统盘后,可直接按照下述操作步骤操作;在云主机关机状态下扩容系统盘后,需先开启云主机,再按照下述操作方法操作。
- 错误的人工操作可能造成不可逆转的数据丢失,建议在进行下述操作前对云主机进行备份。
操作方法
查看内核版本,低于3.10的内核不能保证支持此方法。
 [root@localhost ~]# uname -r
 3.10.0-957.27.2.el7.x86_64
查看扩容后最新的系统盘容量。
 # # According to the command output, the total capacity of the current system disk is 19.5GB, which is 9.5GB higher than the capacity of the partition where the root file system is located.
 # So there is about 10GB of free space to expand the capacity
 [ root@localhost ~]# lsblk
 NAME MAJ:MIN RM SIZE RO TYPE MOUNTPOINT
 vda 253:0 0 19.5G 0 disk
 └─vda1 253:1 0 9.5G 0 part /
安装growpart工具。
 [root@localhost ~]# yum install -y cloud-utils-growpart

 Updated:
 cloud-utils-growpart.noarch 0:0.29-5.el7

 Complete!
使用growpart进行分区热扩展。
 # Because the growpart command needs to pass in the partition number, first find out which partition the root file system is in.
 [root@localhost ~]# lsblk
 NAME MAJ:MIN RM SIZE RO TYPE MOUNTPOINT
 vda 253:0 0 19.5G 0 disk
 └─vda1 253:1 0 9.5G 0 part /

 # The preceding command has found that the partition number to be expanded is 1. Use the growpart disk partition-number command format to expand the partition.
 # If the kernel version is too low, running the following command may cause errors. You need to pay attention to the execution results.
 [root@localhost ~]# growpart /dev/vda 1
 CHANGED: partition=1 start=2048 old: size=19997952 end=20000000 new
 size=40957919 end=40959967

 # Check the partition capacity again. It has been expanded to 19.5GB
 [root@localhost ~]# lsblk
 NAME MAJ:MIN RM SIZE RO TYPE MOUNTPOINT
 vda 253:0 0 19.5G 0 disk
 └─vda1 253:1 0 19.5G 0 part /
扩展根目录上文件系统的容量。
 #  View the current capacity of the root file system first
 [root@localhost ~]# df -h | grep -w '/'
 /dev/vda1 9.6G 949M 8.6G 10% /

 # Select a scaling tool based on the file system type.
 # If the file system type is ext2,ext3, or ext4, you can use resize2fs.
 # When the file system type is xfs, you can use xfs_growfs (this example is xfs, so xfs_growfs is used)
 [root@localhost ~]# xfs_growfs /
 meta-data=/dev/vda1 isize=512 agcount=5, agsize=524224 blks
 = sectsz=512 attr=2, projid32bit=1
 = crc=1 finobt=0 spinodes=0
 data = bsize=4096 blocks=2499744, imaxpct=25
 = sunit=0 swidth=0 blks
 naming =version 2 bsize=4096 ascii-ci=0 ftype=1
 log =internal bsize=4096 blocks=2560, version=2
 = sectsz=512 sunit=0 blks, lazy-count=1
 realtime =none extsz=4096 blocks=0, rtextents=0
 data blocks changed from 2499744 to 5119739

 # Check the current capacity of the root directory again. The capacity has been expanded from 9.6GB to 20GB.
 [root@localhost ~]# df -h | grep -w '/'
 /dev/vda1 20G 949M 19G 5% /


